I just wanted to pop in and wish everyone who follows or will read this a Merry Christmas & Happy Holidays!!! I am a Chistian and am not ashamed to say Merry Christmas. Why is Christmas celebrated? To celebrate the birth of a savior being Jesus Christ. So I decided to add some videos to celebrate this wonderful event and season. Some of the videos I'm posting are secular in nature (seasonal focus). I hope you all enjoy this!!!
God Bless you all and have a safe Christmas and New Year!!!
Excellent Kosher Food

December 21, 2010
November 29, 2010
OK..... What Next?
I haven't posted anything here recently. There hasn't been much time to cook (something blog worthy anyway), digital camera is still on the blitz (hope to fix that soon) and time has just got away from me. Did I quit this blog? Did I walk away from this? No and no. I've had a wonderful time blogging here and learning from so many other cooks.
So this posts title- OK.....what next? Fair question to those who might be reading (at any point in time), here's what I hope to do:
1. Cookbook reviews. I just found a book on meat but this isn't like any other book. I'm just now starting to digest this book because it has a TON of information (some I didn't know of before). If this is anything like my first glance, this should be a good review. What I can say about the book in question is thank goodness for:
a. gift cards!!!
b. 50% off Thanksgiving weekend discount (thank you Borders for offering the promotion).
2. More adventures (reviews of places and products). I joined Yelp not long ago (johnduncan.yelp.com) and I've done several reviews of local places. I hope to share more here.
3. I may revisit some subjects I wrote about before but put a different spin on them. Recently, I became a big fan of Create TV. The "American's Test Kitchen" franchise is very prominenet on that network. Some of the things they did were things I knew but quite a bit I didn't know.
4. Be open to what else food-related comes along. This has been a lot of fun and miss not being able to share more here.
My goal is to get back here soon with more stuff. In the event that doesn't happen, I would like to wish anyone who sees this a Merry Christmas, Happy Hanukkah, Happy New Years (I should be back before then) and any other holiday I missed!!!
October 19, 2010
Spice Contest
If you follow the Foodie Blogroll, you know they have contests, giveaways and other promotions. This month, one such promotion involves spices. That's right, spices. A set of 10 and a set of 6 spices are given away to selected winners. The sponsor for this contests is Spices Inc. To enter, follow the link listed below:
http://www.foodieblogroll.com/contests/comment-to-win-a-10-jar-set-of-spicesinc-spices
Good luck!!!!
http://www.foodieblogroll.com/contests/comment-to-win-a-10-jar-set-of-spicesinc-spices
Good luck!!!!
October 11, 2010
Hungry Hound: Focus on BBQ
I enjoy many of the local news specialty segments. One I enjoy a great deal (when I can see it) is "The Hungry Hound", seen locally on ABC 7 Chicago. So this time around, I decided to share some of the segments he featured on BBQ. At the very least, you may get some inspiration in your cooking. Here are some of the segments (some more recent than others). Steve Dolinsky is the host. He had some huge shoes to fill when he replaced the late James Ward. He was the right guy for the job, having won James Beard Awards for his work on radio and tv. Since he took over this Friday evening staple, he's done a fantastic job. I hope you like these segments. All the locations are located in Chicago.
Lilly's
Chicago Q, featuring KOBE Beef Brisket. I REALLY hope to try this soon.
Honky Tonk BBQ. I ate here about 1 1/2 years ago & liked it. It's pretty informal (as opposed to the more formal Chicago Q listed above). I had the St Louis Ribs and liked them.
Paulina Market, a good place for smoked meats (not just BBQ alone). It's been about a year since I went here but this is a good source to get some good sausages. If it's a type of meat you want, chances are you'll find it here.
September 13, 2010
Well summer is over
I had planned on posting a few more adventures and meals but only one problem. My digital camera went totally on the blitz. In fact, I was getting ready to use a picture for this blog's new background & everything went crazy!! I would turn on my camera and it would either freeze and shut off, not take a picture or wouldn't even turn on (even with a full charge). So now, I need to either get it fixed or buy a new one all together. I hope to do this soon because there are some good things I would love to share. Sooner than later, I hope to fix this problem. Thanks!!!!
August 4, 2010
Healthy Eating Cookbooks

This is a different angle than I normally write about. I've shown different foods and places I've enjoyed eating at (normally not "healthy" as some may say). Contrary to what you may see here, I generally eat well and understand cooking with good health in mind. This post diviates from what I normally write about. I decided to take 4 cookbooks I own and discuss them. Is this a review? Not really though you could say it is. You may notice something that stands out. Of the 4 books I'm discussing here, two of which are from well-known spas, one by a Doctor, and the last in partnership with a major health facility and major retailer. I like all of them but I will rank them by how I eat. All the books do a great job when it gives VERY detailed nutritional information. These books were all released between 1995-2000.

"The Gourmet Prescription", Deborah Friedson Chud, MD, Bay Books, 1999.
Of the four books, this one reflects what my diet looks like. One thing I will say is that this book is very red meat friendly. In fact, ostrich is also featured in this book. The intention is to provide high flavors and lower carbs meals. I think it did the job well. You could easily remove the "low carb" emphasis and most probably would never know the difference. If you recall "The Zone Diet" by Dr Barry Sears, this book was inspired by that. Eventually, Dr Chud and Dr Sears worked together on fine-tuning the Zone Diet. Most of the things you use already (such as ingredients) will be used in this book. There are no needs for exotic or hard to find items, though you can take some liberty here. One side I liked was the black-eyed peas with greens and smoked garlic (pg. 189). The book uses collard greens but I prefer mustard (not quite the same bite with mustard). This book also received glowing reviews from Ronald Arky MD (distinguished Doctor and Professor at Harvard) and Steve Reichlen, BBQ master and host of "BBQ-U" and "Primal Grill" as seen on PBS. I think that alone may get someone's attention. There aren't very many pictures in this book, but the writing style flows very easily.

"The Mayo Clinic-Williams Sonoma Cookbook", Mayo Clinic,Williams Sonoma, John Phillip Carrol, 1998.
If you're looking for a perfect marriage, this is one such example. What do you get when you take one of the finest medical facilities in the country and combine it with a specialty foods retailer? The result is this book. Whoever thought to create this book was pure brilliance if you think about it. This book does deliver and I'll give the radio edit version. Like the "Gourmet Prescription" book, this book doesn't use a great deal of obscure ingredients or items that would be hard to find. One thing that stands out is they actually have meals broken down by seasons (e.g., one pot meals for winter). It also does a great job in the emphasis of using ingredients that are in season for the best results. Also great are the breakdowns in two subsections. The first, like "Prescription", does a very good job with nutritional values. The nice part is the cooking tips giving in this book. For example, the Provencal chicken and fennel calls for alcohol. On the same page, it mentions how much alcohol burns off while cooking (pg. 187). Then they go further to provide alcohol substitutes for those who do not consume alcohol (pg. 207, as seen below).

One tip that stood out was storing asparagus for the spring peas and asparagus (pg 83) if you don't use them immediately. It suggests to wrap them in a damp towel and store in a plastic bag for up to 5 days. The recipes could be a challenge to an amatuer cook but would encourage them to at leat try this book. If you can say you're at least a novice cook or better, you should have no problems with this book at all.

"Canyon Ranch Cooking", Jeanne Jones, 1998, Harper Collins.
The next two books are featuring well known American spas. Canyon Ranch is a well know spa with locations in Arizona and Miami, Florida. They focus on the health and wellness. For the most part, this book has standard spa fair but all are pretty good. There are plenty of good alternative dressings. The detail might be a bit much for a novice cook because there is so much information in places to digest. Unlike the other two books I mentioned, this book tends to favor meat as much. While there are recipes for beef, lamb, veal and duck, the books encourages using them as a condiment (which for some could be a challenge). This book has a guacamole recipe that has no avocado (strictly steamed asparagus). I haven't tried it this. One thing I DO like a great deal is the cold pea salad (pg 106 as seen below).

"Canyon Ranch Cooking" as it relates to me, I could suggest it but might be a bit much for a novice cook. If you are a novice cook, take this book slowly and enjoy the ride. Start with the salads, sides and beverages then go forward from there.

"Golden Door Cookbook", Michel Stroot, 1997, Broadway Books.
I have mixed opinion on this book. I do like it but...just a few things that frustrated me just a bit. I did not see one recipe that included red meat but the turkey, chicken and duck recipes are also very good. Then they have things that I did like. You may consider trying the guacamole, made with one part avocado and one part peas (I have and its pretty good). There was also a roasted turkey with with parsnip-carrot sauce that I REALLY liked (pg 178, as seen below) .

There are many recipes that include seafood so either you can try to substitute chicken or another meat or just avoid it all together. A pretty strong Eastern influence is seen in this book, which isn't bad but may explain why there are no red meat recipes here. This book has MANY so there is quite a bit to digest. This book is not exactly for the meat & potatoes eater but there are some good things here. There are some VERY good things in this book but at times, it may be stretching themselves thin at times. There is a newer "Golden Spa" book, written by Chef Dean Rucker, who joined the Golden Door not long after this book was written. This book is pretty vegan-vegetarian friendly. I guess if I visit the Golden Door sometime soon, I might have a better vibe (ok, understanding for the grammar snobs) if I experienced this facility myself. I found enough in this book where I would suggest at least reviewing it for yourselves.
July 27, 2010
America's Dog: Chicago Hog Dog Chain takes a Different Angle

Here's another adventure. This journey took me to a place called America's Dog. What's the concept? It's pretty simple. The celebration of the hot dog- America's tasty treat. It features a hot dog as made in the various American cities. The founders went on a road trip and tried how people eat hot dogs-what way, how prepared, and most important, what's on them.
Now in Chicagoland, there's only one rule- no ketchup (at least until you turn ages 10-12)!!! Pretty much everything else is fair game. If you want a tomato based product, slice or dice some tomato or add some salsa. I think ketchup kills the texture of the dog. I tried it as a kid ONCE and never did it again. The Chicago hot dog is simple- tomato, pickle, relish, onion, mustard, onions, sport peppers and celery salt (just a dash). That's just how it is. Most people here may not put all of the above items on each time but most of them do generally appear (most common- mustard, onion, pickle, tomato seem to be the common edit to this dog). Some places will just a hot pepper in place of sports peppers to add more heat.

As it relates to suggestions, pay the extra $.50 and get a jumbo hot dog. It will be worth it. They have 17 different dogs alone including the Chicago Dog (not including the Maxwell St Polish- another treat in itself. Now, I'll get my criticism out of the way first and they are very few. First of all, Coke fans like me won't like the choice of drink (hint-hint). I'd have to say the oddest of dogs to me was the San Francisco Dog (Chili, mustard, ketchup, relish, onion, pickle, tomato, shredded, cheddar cheese and celery salt). This dog seems to be suffering from an identity crisis. The Atlanta Dog seems to have some debate. The common choices were cole slaw, chili, mustard and onion. Some, like America's Dog, have ketchup on their Atlanta style. That's a discussion for another day. If in doubt, order the Philly Dog, where you put whatever you want on it.
I bought two dogs- the Dallas and the Baltimore. The Dallas Dog is basically a chili dog (Chili, onion and shredded cheddar cheese). Its sybling, the Houston Dog, is chili alone. The Baltimore Dog was a bit more of an adventure (Deep fried dog, with melted cheddar and grilled onions). I enjoyed both and the Baltimore was better than I expected. The texture was rock solid. I actually debated on the Baltimore and the Charleston (Cole slaw, chili, onion and mustard). Cole slaw is a southern thing but it works for me. It tastes very good. I regret not taking pictures of my food due to my camera battery deciding to die on me.
If you want to see the entire menu, here it is: http://www.americasdog.com/docs/AmericasDog_OrderForm.pdf

There are four locations in Chicago. I went to the one on Randolph Street (just east of State Street). The location is also on the north entrance of Macy's (Marshall Field building). So that location is easy to get to if you're walking downtown in Chicago. DO NOT TRY TO DRIVE THERE because there is no parking lot (free lot anyway). Out-of-towners, if you go to Navy Pier, they have a location there as well. There are plenty of other items to try as well (beefs, burgers, etc). The french fries were very appealing as well. Notice how my bag mentions being "voted #1 hot dog" but I am unsure who gave this honor. Nonetheless, this is a worthy stop and makes their own mark in a very well-saturated hot dog market. They found a niche and running with it. You may follow them on twitter- @AmericasDog.
July 15, 2010
The Grill as a Chafing Dish

The grill as a chafing dish? Yes!! It can be done. I did it and here how it worked.

This year on July 4th, I had a "ah-ha" moment. This isn't something "innovative" but something came over me to try. I decided to use the grills as chafing dishes. I guess part of it is that it was over 90 degrees that day and didn't want to heat the house up. So then, we can keep the food (ok, meat) warm by using the grills. As you can see in the picture above, most of the coals (in the coal boxes) are ash. They were still warm. I kept the fire going by adding a few more coals to keep between 150-175 degrees. The goal isn't so much to cook but keep warm or reheat. All the meat has been cooked already. I control the heat by opening and closing the openings on the top of the grill (just as you would when you grill but lower heat). Low & slow masters can do this in their sleep.

If you use a kettle grill, I would have you try the following. First, use a pan like the one above. Second, keep the meat covered (I did the same with the dual-zone grill). How do you control the heat? In the kettle grill, move to coal boxes directly under the pan (direct heat) early in the warming process (to reheat). The time to reheat depends on how hot your fire is, how much meat you desire to warm up, and the temperature of the meat (directly out of the fridge or being at room temperature). This warming process can take at least 15-20 minutes but could take more. Once the meat is warmed to your liking, move the coal boxes towards the edge of the grill (indirect heat). Above are chicken legs, covered with foil.

Now if you have a grill like the one above, you can easily guage the temperature. This is a two zone grill. If you look closely, you'll notice the guages are reading between 225-250 degree mark. On the left side, I had the grill temperature at 300 at its highest point as I was still cooking some food. Ideally, if I want to "chaf", the temperature should stay under 175 degrees (200 at the very most).

Now for the fun part- the meat. My uncle made some good stuff- rib tips, hot links, and chicken wings.

More links, rib tips- ribs are a given (which is why I didn't add them). One day, I put out a rib tip post should time allow.
June 29, 2010
Garlic-Stuffed Pork Shoulder (Modified)

This is a cut of meat that I REALLY enjoy. This is a pork shoulder (about 3 lbs) of tasty eating when properly cooked. There are several ways to cook this meat. There really isn't much to this. People tend to shred pork shoulder (e.g., shredded or pulled pork) but I don't. Don't get me wrong. I like pulled pork but keeping it in roast form is how I prefer cooking and eating it if I had my choice. You'll find good pork shoulder at your local supermarket or butcher. Above you'll see the shoulder and a head of garlic. You can put as much as you want in it (I did the entire head since I was the only one eating it).


Simply put, I slit around the fat or bone and stuffed the cloves inside them. There is enough fat on this cut where I made the slits in the fat (left) or around the bone (right). Both are ready made to do this. When you stuff along the bone, I took a utility knife and created the slit around the bone.

As it relates to seasoning, you can pretty much add what you would like. On this day, I kept things simple. You can do that with this cut of meat- kosher salt, ground black pepper, cayenne pepper, paprika, onion powered, oregano (not pictured) and olive oil. I took enough of each spice to cover the entire cut of meat on all side. You noticed that I placed olive oil on the list (on the left).

Then I wrapped the pork shoulder and let it sit in the fridge. I would suggest at least 3-4 hours but overnight or a day would be ideal. I placed enough olive oil to cover the meat but gentle rubbing into the meat. I tried this years back and I liked the flavor. I had first mentioned that I placed the olive oil on before I wrapped it. I was actually distracted (someone sent a reply about this being a no-no). I only placed the spices on first. For whatever reason, I was distracted when I put this together (and finding the right pictures was an adventure in itself. I did roast some garlic the same time I did this. You might notice in the picture above, the olive oil is not in the picutre (it is in the picture the photo before). Sorry for any confusion and thanks to whoever tipped me off because I know better.

If this picture looks familar, this is the one I used in a different post. I did them the same day. The catch is cooking this slowly. When starting the fire, I like to use auto-light charcoal in a chimney (as you can see above and yes, I'm about to get a new one). The normal charcoals (non-self starter) make the bed (as seen on the bottom left on the picture. The zone to cook on is on the right. I used indirect heat. The trick is getting the temperature in the right zone (somewhere between 225-240 degrees). Once the fire has been built, I added a mix of soaked wood chips and dry wood chips. Some say only used soaked chips and some day use dry only. That's a debate for another day but I know where I stand. The rule I follow is cook the shoulder about 60-70 minutes per pound.
I made on mistake. I started the fire too hot initially (about 300 degrees for about 20 minutes and 275 degrees for about 15 minutes. You may notice at some BBQ places or TV specials, you may notice that the cook has a garden hose and they will spray the fire (BRIEFLY, for about a second). This is one way to control the temperature. I also readjusted the position of the coals (moving more of them towards the end away from the meat). Still, the fire was a bit too hot so I removed some of the coals taking a shovel end (or whatever tool you use to adjust the coals), placed them in a safe spot and let them burn out (I used the kettle grill I wasn't cooking with that day.
I won't waste much time on this part of it because people use many different grills and many (unlike this one) without a themometer. One way I guage the temperature with no themometer is once the coals a prepared, I placed my hand about 6 inches away from the grill and counted 1000-1, 1000-2, and so on until you feel the heat. The faster you feel the heat, the hotter the fire is (yeah, right?). If you do it this way, you should be able to count between 1000-2 and 1000-3.
Now for the meat of the matter:
a. Keep temperature between 225-240 degrees. This way it will cook slowly.
b. By keeping that temperature, I cook it for 3 1/2-4 hours under normal circumstance (ideally, you want the internal temperature should be between 170-185 degrees). On this night, I cooked on pork shoulder roast and 2 slabs or ribs.
c. Every 30-45 minutes, I would suggest either the mop sauce or your choice or baste with a liquid like stock (I placed my mop sauce in the BBQ ribs post).
d. PLEASE do not add sauce until the last 15 minutes or so. If you do, the sauce will burn and this cut won't taste right. In other words, you might ruin the meat.
Then after all is said and done, the payoff-

I would encourage you to let the meat "rest" (let it sit on a plate or platter before cutting) for 15-30 minutes. My family and friends will verifiy I can BBQ pretty well. That way, all the time you spent creating this masterpiece won't dry out for future meals. Now if you really wanted to shred this, you could. As I said already, I prefer to not do so.
June 2, 2010
Quick Guacamole: Rotel Diced Tomatoes and Frontera's Guacamole Starter

Are you in a mood for guacamole but want something quick? Well I have the product for you. I suggest you try Frontera's Guacamole starter. You may notice the Frontera name and associate it with Chef Rick Bayless, who owns a restaurant by the same name. For those who are not familiar with the name, this is the product line they produce. It can be found at local supermarkets and specialty shops. I first tried this about a 2 years or so ago and really liked it. It's so simple to use, too!!
The first step is to take 3 ripe avacados, remove the core and then scoop out the avacado. What I would suggest is to slice the avacado while it's still in the skin. Take a utility knife and then slice the avacado 3-4 times from side to side, then do the same from top to bottom (as seen below).

I find doing it this way makes it much easier to remove the avacado from the skin itself. After doing this, take a spoon (you can use a fork but I find a spoon easier) and scoop out the avacado into a bowl. Take a potato smasher and crush the avacado to an almost paste like consistency. While I did this, I added a dash of cayenne pepper (partially for color but partially for flavor). Next, add Mexican oregano, tomatoes, onions, and garlic. I prefer the zip of Rotels when using canned tomatoes. Since other family members might eat this, I used mild intead of hot. Once I get the consistency I desire with the avacados, I folded the tomatoes, onions and garlic together(as seen below). Now the directions also suggest adding fresh lime but this time, I decided against it.

The directions are almost fool proof. After that, I placed the mixture in the refridgerator and let it remain for the rest of the say. The directions say 2-4 hours but I decided to let it go the rest of the day.
BBQ Baby Back Ribs: My Way (at least the basics)!!!!
BBQ Baby Back Ribs are a personal favorite of mine. I would do these year-round if time permitted me to do so. Over the years, I have learned so much about BBQ (not just grilling alone). So many different ways to cook them so I decided to post how I like to do them.
First is the plainly obvious- the ribs themselves. Aside from baby back ribs, there are spare ribs and country style ribs as well. There are also beef ribs but my taste lean towards pork. I guess that's more a regional thing as I am from the Midwest and pork ribs seem to be the most popular. I have also enjoyed venison and buffalo ribs but they tend to be more expensive (and more difficult) to buy. Lamb ribs work well too, especially if you like garlic. So below are the ribs- clean & rubbed dry.

Now here's where the fun starts. My desire is not to sound like I'm being negative but I will address two of many no-no's as it relates to BBQ ribs. First, DO NOT BOIL THEM AND PUT THEM ON THE GRILL!! If you want back back rib stock or you're making a German dish (German-style boiled ribs), go ahead and boil to your hearts desire. You lose all the flavor by doing boiling.
The second no-no will be addressed in the two pictures below. Remove the membrane from the ribs. The membrane is the film you see on the back of the ribs. To remove it is not that difficult at all. You take a utility knife and cut between the meat (ribs) and the membrane (as seen on the left below). My suggestion is to start at one end and get the membrane loose enough where it will pull right off. Do this before you do any marinating or seasoning. Removing the membrane will help the meats be flavored (with marinade or seasoning) and will help it cook properly. Unlike the casing with a sausage, it does not provide a compliment the rib's taste or flavor (let alone edibility). On the right (below), you will see one slab with the membrane removed (lower rib in the picture which is more white-colored) and the one without (top of the picture).


At this stage of the game, here's where it can get messy. I did these with a dry rub (without marinade). There's some debate which way is better but I like marinade-style ribs as well. First I used kosher salt on the ribs before adding my rub. The rub's seasoning featured the even amounts of the following spices- cayenne pepper, black pepper, garlic powder, onion powder, paprika (I prefer Hungarian hot but use whatever you like). I also added a dash of dried mustard and a couple other seasoning I don't wish to disclose (at least right now). In other words, this rub is favors the Memphis style (no sugar) meets Carolina (where my own touches were partially inspired). Make sure you make enough where the ribs are totally covered on both sides for best flavoring.

The fire is your best friend. If you have a thermometer on your grill, you may be better off as a result (especially when trying to gauge temperature). Now here are some other no-no's that experts seem to understand. The next BBQ no-no- DO NOT USE LIGHTER FLUID!!!! Unless you like the taste of gas or fuel, avoid using lighter fluid. With the various products in the market today, I'm shocked lighter fluid is even an option (as you will see below). You can get a chimney (at your local hardware or gourmet shop for about the same price), which I used here. You can also buy ready start charcoals, where your need for lighter fluid is gone. There are also lighter sticks (similar to a match) where you place them in the chimney along with the charcoals. Then strike the bottom of the sticks (from the holes under the chimney). It may take 10-20 minutes for the coals to become ready for use.
When making ribs, I prefer using indirect heat (placing the coals away from the meat, letting the heat circulate inside the grill. If you use a kettle style grill or a dual chamber grill like I use here, you know I'll give another no-no. Don't cook the meat over the fire but just away from it. Also, just because you don't see fire, doesn't mean the fire isn't hot. The grill I used had a temperature gauge when I can see what temperature I'm cooking at. If not, look for the coals to be more red/ash like color. I took more non-ready start coals and line the grill's bottom left half (as seen below on the lower left side of the picture). Then I took some presoaked wood chips (use the flavor that you like) and placed them on top of the unlit coals. Once my coals were ready, I poured them over the unlit coals and wood. The goal is to keep the temperature in the indirect zone (right side of the picture below) between 225-240 degrees and cook for 3 1/2 hours. I created a "mopping sauce" of my own- 30% cider vinegar, 20% one part wocheshire sauce, 5% olive oil, 5% tomato paste, 5% water, and the remainder Dijon mustard along with about 1 teaspoon of salt and pepper. I will add the mop sauce ever 40-60 minutes. On the side where I cooked the meat, there are no coals and the zones were not divided. While cooking, I used a rack so there is some debate if the ribs should be flipped or not. The last no-no- do not use a fork when you flip the ribs but use tongs. By using a fork, you will pierce holes in the meat and the ribs WILL dry out. I don't add any sauce until the last 20 minutes at the earliest.

I took this video from the "Seriousbbqsdotcom YouTube page. This may help explain (or give a better visual) of the process.
After 3 1/2 hours, the ribs should be done. The meat should just pull away from the bone (not falling off) with some slight resistance (almost like a steak). Then let the meat "rest" (where the meat sits on a pan or plate) for at least 15 minutes. This is how the meat's juices settle inside the ribs and insure they won't dry out.
The result is what you see below.

Memorial Day Tastiness

Here is my Memorial Day dinner this year. I will share in greater detail how I cooked these dishes very soon. Clockwise from the top- BBQ Baby Back Ribs, Baked Beans (from the can- time didn't allow me to make them from scratch), Macaroni Salad (using elbow macaroni), and Garlic Pork Shoulder.
I will feature the items I made in the days ahead. This was fun to make and even better to eat!!! THIS made for a perfect meal to watch the Stanley Cup.
May 12, 2010
Mother's Day Dinner: Asparagus Anyone??????

Asparagus Anyone??????
OK. I already did a posting on asparagus a while back but I figured I would revisit the subject. It’s only in my later years that I actually appreciate this wonderful veggie. Part of that is because I finally learned how to cook it properly. You know the problem. Regardless of who cooked it, the all-often-but-unintended result is they get overcooked. They’re either cooked for too long or sit in liquid for a too long afterwards. I have finally figured out (ok, I did a quite a while back but work with me) how to avoid this mistake and how to cook asparagus properly. Here’s what I didn’t share on the previous post. This features matsutake mushrooms, which were samples I received from Marx Foods.

1. Apart from chopping off the lower part of of the stem (which is too hard to cook or eat), I read somewhere that you should shave the lower 2/3 of each stalk. Now there is some debate if this should be done or not. I did buy some white asparagus a while back (from Chile during the winter) and it did mention shaving the lower 2/3 of each asparagus. I did so and it has turned out very well. So I've kept on doing this.

2. Now while I don't want to sound arrogant, I can't really put this any other way. For goodness sakes, make sure you do two things. First is to make sure that you find a pan big enough to accommodate the length of the asparagus. If they dont fit properly, they obviously won't cook properly. I've seen folks trying to cook these in a medium sauce pan (no kidding). Next is to make sure the water is boiling (almost like you're cooking pasta). All I added to this boiling water is some salt and extra virgin olive oil. These are my preferences alone. I cooked them for about 10 minute and removed them from the pot once fully cooked. I put them on a plate and covered with foil. That way you won't have this fine (and somewhat expensive) veggie go soggy and stay warm if you don't serve them immediately. Even when I do serve immediately, I drain the water from the pot and cover.


3. In a pot, I reconstituted these mushrooms for about 20 minutes (next time I might do it a bit longer). Then I did a nice sautee of the mushrooms. I used some chicken stock (enough to cover the bottom of the pot) and a little more olive oil. I sauteed them until they were soft (about 5 minutes or so over medium heat).

4. Then I returned the asparagus to the pot and tossed them with the mushrooms. One thing I will say. Since the asparagus was not overcooked (e.g., too soft), I could have made put this in a pasta salad and served them cold. That's a thought for another day. Below is the result of how we served this. The plate with the lobster (cooked by my Dad) was my Mom's plate and one with the steak was mine. We did have a salad as well but as you can see, the plate was too small to add (in both cases). The meal was a hit. Mom liked the compliment the mushrooms added to the asparagus.


(I placed some cayenne pepper on my mashed potatoes. Steak was medium rare of course!!!! The beauty of the Weber grill).
I hope you enjoyed this!!!
5 Guys Burgers & Fries: One FANTASTIC Burger

OK. It's time for another adventure. As I was watching listening to the radio this weekend, I heard the hosts on some critical rant about Phil Mickelson's diet. This guy ripped him for eating Krispy Kreme during the Masters (which he actually WON) and going to the place I am about to mention now (during Players Championship where he placed tied for 17th).
I never heard of 5 Guys Burgers & Fries. My think was come on- get serious. 5 Guys Burgers and Fries is the actual name? I assumed that it was only a Jacksonville area or Florida chain. How wrong I was. They started in Washington, D.C. My curiosity caught me so I decided to do an engine search for them. Not only did I find out what they were a growing national chain but one was RIGHT UNDER MY NOSE and didn't even know it. In fact, I noticed it was rated highly in several cities by food reviewers, rated in Zagets (yep, that one) every year since 2001 and rated top burger in D.C. since 1999 (Washington Magazine's Readers Choice). So I look at the main Internet site's menu and how simple do they make this? It's so simple it's not even funny. Here it is:
- Four burgers- hamburger, cheeseburger, bacon hamburger, bacon cheeseburger (there are also "little" versions of these as well),
- Four sandwiches- Kosher hot dog, cheese or bacon dog, cheese bacon dog, veggie or grilled cheese.
- Regular or Cajun fries- regular or large (WARNING- fried in PEANUT OIL).
- Coke products and bottled water.
So upon my arrival, I did notice a wonderful smell or meat, grilled to perfection. Now most places give you an option of topping a, b, and c. The burgers (double by default) are a bit more expensive than most (though not radically more than a triple-cheese at some chains) but you do get what you pay for. Now back to the toppings. You want topping? You get them......plenty of them and all free- mayo, relish, onions lettuce, pickles, tomatoes, grilled onions, grilled mushrooms, ketchup, mustard, jalapeno peppers, green peppers, A-1 Sauce, bar-b-q sauce, and hot sauce. You can order "standard" (those in bold black print), "your way" (a mix of both black and red toppings) or "all the way" (everything you see- all 15 toppings). If you take a peek at the top photo, you'll notice the detail of how my order was taken. My wait was about 5 minutes for my order. I went on a Saturday late afternoon and there were 2 people on the grill. The wait was worth it. I must say this was one of the finest burgers I ever had. The result is below.
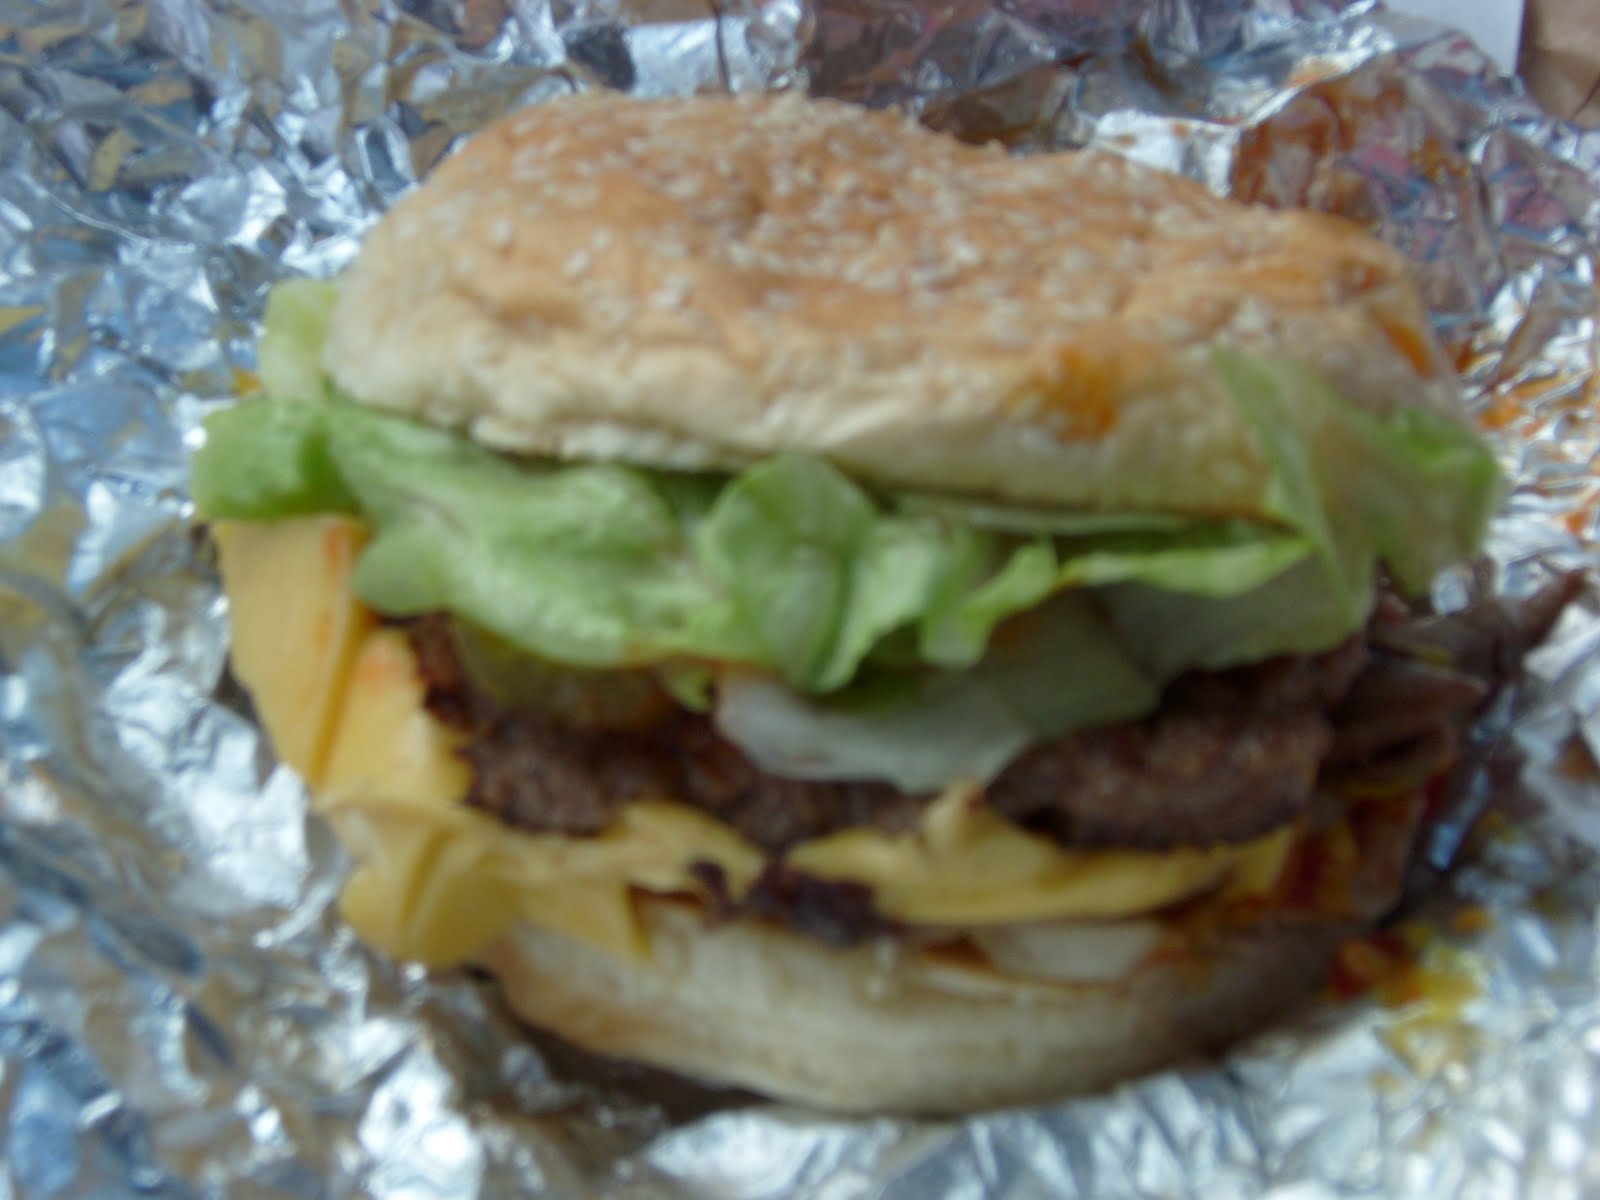
This cheeseburger was SOLID!! As good or better than I would get at some full service places. The lettuce was crisp and fresh (and didn't put too much lettuce on the burger), meat was juicy and the toppings were perfect. All too often places put too much ketchup and not enough mustard or vice versa. This was not the case here. The grilled onions were placed just under the lettuce and the mushrooms were on the bottom of the burger. If you see this place in your travels, TRUST ME!!! It's worth a visit. To me, this is a 10 out of 10 rating.
April 29, 2010
Serious Double Cheeborger

OK burger fans. Does this look good or what??? THIS is what I call a cheeborger (cheeseburger). Wait a second. My title says it's a double cheeborger (cheeseburger). That's right friends. It is a double. I did it like this
First I took 2 8 oz hand made patties (not sure if I used 95% or 85% lean but that doesn't matter and might have been more than 8 oz) and cooked both (season with the flavors you like. I used salt, pepper, garlic, cayenne, hot paprika, oregano, parsley, and a few other things I managed to forget). Then I grilled onions and after I turned the onion, I splashed some habanero sauce on them.
Lastly, I built it. You can see the top layer- burger, onion, and swiss cheese. The bottom layer separates the top level with onions, swiss cheese, Velveeta, and some salsa (you can’t see the bottom level because the separating level covers it). I didn't have a bun so I used wheat. I topped it all off with Butch's BBQ Sauce (thermonuclear) & Miracle Whip. Served with a pickle (ok, 2 pickles) and a nice handful of chips!!!! As I have said before, you may not get style points here but I PROMISE it will taste good!! So good, I'll put the picture below here too. Getting any inspiration??
Subscribe to:
Posts (Atom)