Playlist

Local Folks Foods

Excellent Kosher Food

January 11, 2010

Chicken Wings at Last

I wrote a chicken wing post not long ago so now I decided to add some pictures. This is how I do them, although the spices may vary. First are the spices (here I used garlic powder, cayanne, sage, rosemary, kosher salt, ground black pepper, onion powder, oregano and parsley (I was out of hot papaprika):


Next, I coated each side with the spices I used. I may not use the same spices every time but this gives you an idea of how I liked them. Rosemary works VERY well with wings. Normally, I would line the bottom with aluminum foil to provide easier post-cook cleaning. This particular day, I was out of foil to but decided to keep moving forward (I was REALLY in a wing mood that day). Since the wings were frozen (slightly), I cooked them for about 40 minutes (unthawed would normally take 20-25 minutes) at 350 degrees. This could vary by size of the wings and the producer's suggestions on the instructions. The time and temperature I used were based off the cooking instructions on the chicken wings bag. PLEASE follow all normal handling instructions as it relates to chicken (e.g., it's handling, placing raw chicken on surfaces, etc).


Third, is the wet sauces I used to coat the wings once they finished cooking. You can get your sauce of choice or make one up as I did. I took 2 of my favorite BBQ sauces, hababero sauce, and a touch more oregano, parsley, garlic powder and cayanne. I used enough where I could coat the wings as needed.


After I cooked the wings, I took cooked wings and coated them in my sauce on the fly. Notice I used a metal bowl. You will have better success coating the wings using a metal bowl (especially once the wings come out of the over) because the metal conducts heat. My experiences have shown me that the coating stays on best that way. By the way, I forgot to metion that I placed some sour cream and pecorino- romano cheese in this mixture as well. Toss the wings until each side of the wings are coated.


Finally, the finished product!!!!! Did I mention that style points don't count here!?!? As you could imagine, I ate pretty well that evening (there were more wings , but only some made it to this picture).


January 8, 2010

Hungry Hound: The Claim Company keeps salad bar the same

From the "Hungry Hound"


The story below in print form.
The Claim Company keeps salad bar the same

Posted using ShareThis

Let's Talk Turkey!!!!!

OK. I decided to cook a turkey not long ago. I had some time on my hands so I decided to do things a bit differently than I normally would. Besides, a 14 lb turkey at $.59/lb is nothing to shake a stick at. So my thinking was I would have some good lunch meat for a while so I took advantage of the deal. How did I do this? What did I do differently than I normally would have done? Let's take a look below.
  1.  First, the turkey was placed in water to unthaw (I did it for about a day and a half). The seasoning used were all the basics: kosher salt, cracked black pepper, ground black pepper, oregano, sage, thyme, rosemary, onion powder & garlic powder. My view on garlic is this. I use fresh garlic on sauces and garlic powder on rubs or mixed with dry seasonings. The common factor is that it is consistant with the substance I am using. Fresh garlic doesn't work very well in dry rubs. If it does, I have yet to experience it. I'll use whatever garlic I can get my hands on and use it. Normally, I would add some hot pepper (habanero, for example) but decided against it.  I like adding those things to my salad dressing or gravy (which in this case, I didn't do).


2. Next is where the adventure begins. After the bird was fully unthawed, I cut undernear the skin (top) and seasoned underneath the skin (bottom). I used a knife and cut between the meat and the skin. I left it at room temperature for about 20 minutes or so in order for the skin to be easy to handle.


3. The next thing I did was to take the end of an onion and place some olive oil on it. Once I did this, I then seasoned the onion slices with  more rosemary, thyme, ginger & sage. This went inside of the turkey's cavity. I have also used basalmic vinegar inside as well but this time, I didn't have any on hand.

4. This is the end result, done in a roaster for just under 5 hours on a rack. I let the turkey rest for about 30 minutes but I didn't expect this result.  Notice how this turkey is literally falling off the bone (the two bones on the bottom are the legs I pulled off without even using a knife). One of the things I did was fill the roaster with enough water to fill the botttom (giving it a steam room effect to it).


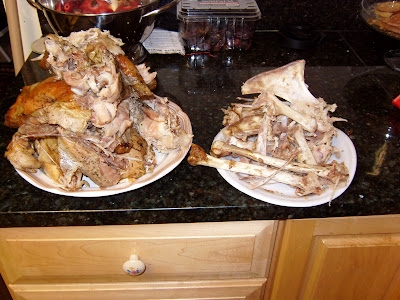
5. On the one side is all the meat I had from the turkey and on the opposite side, the carcass. I BARELY used a knife to pull off the meat because it came off with little or no effort. Notice how clean the bones are? Yes. Not to brag but I think I did myself proud.


This was one fun dish to make!!! Guten Essen!!! Mangia bene!! Good Eating!!!!